27 December 2005

Whupped

I've spent most of the day today humping the trash down the stairs from the apartment.
If my guru the ex-Marine was here we'd be done already. He once told me that, "Running up and down the stairs is how you keep the job moving along" Well...screw that, I wear size 13/14 shoes and have enough trouble navigating stairs at normal speed...no way I'm gonna run up and down. Plus I guess I've gotten out of shape in the past couple of years since I worked for him because 4 or 5 trips up and down from the third floor seems to be about all I can handle without needing to sit down and take a break.
In the back of my mind I'm still weighing having the carpets cleaned and calling it a day on this project. We'll see what they look like when I get everything out of the rooms. I'd call a professional carpet cleaning place and ask them if they could get them back to looking half way descent and what that would cost me. I don't think it would be anywhere near as much as replacing the carpets even doing it myself and buying carpet that is around $.50 a square foot (I need about 600 square feet).
We'll see...there's still a lot of junk up there and a lot of tools and project leftovers that need to go down to the basement.
I'm thinking about keeping the windows.
They suck for an apartment but for a greenhouse or a garage/workshop at my next place they really might be worth hanging onto!
If Kevin shows up today (It's his day off and he often drops by on Tuesdays) he'll be greeted with the absolute joy of helping me clear the path (putting the windows and leftover sheets of greenboard drywall from the bathroom project (Jamey's" Home Repair Journal: Window to Wall 6) that is still laying in the stairwell down into the basement so that he can help me bring the old stove down and put it out on the curb (It's trash day tomorrow). We'll leave bringing the new stove up for Sunday (If he dares to return after that), his other day off and he drops in a lot then too. Besides...I haven't bought the new one yet.

26 December 2005

Punch List

So I was sitting and thinking over the weekend about what I have left to finish up. When a job is done or just about done the General Contractor will go around and make up what's called a, "Punch List" which is simply a thorough list of all the things that need to be finished or touched up as the job starts winding down.

Still left to do:

Thermostat (buy and install)
Carpet (buy and install)
doors (paint, clean, re-hang)
Tub Faucet (Call Delta about the faucet not shutting off right)
Paint Trim (topcoat bathroom, touch up elsewhere)
Stove (buy and install)
Access panel for Bathroom Plumbing (cut, paint, install)
Storm Windows in Hallway (find, clean, install)
Paint Lazy Susan
Fix UnderSink Shelf (new wood, better support, tile with leftover floor tiles(?))
Doorbell (fix? replace?)
Puck Lights (Install in kitchen including mounting new wall switch)
Transition Strips ((between rooms), buy, install)
Re Caulk Bathroom (?)
Bathroom Fixtures (I still don't know where to put the TP holder)
Blinds (buy and install...I don't want to leave it up to someone else to pick and try to hang them)

Also on my paper list but already crossed off are:
Vent Hood (buy and install)
Re-assemble Fridge...I had to take the doors and all of the hardware off to get it out of the kitchen to put down the new floor...it BARELY fit thru the door...getting it back in is the only thing I've gotten help doing so far on this entire project...I dragged it out on it's side but I wasn't going to drag it so I got my friend Kevin to help me carry it back in. I laid plywood down over the floor to protect it as I bring the appliances back in and such.

So that's pretty much the list. The only big thing left is the carpets. I've never done carpet before but I can't see paying how much they get for installation....seems ridiculous. Plus I have a cousin who lives with a carpet guy and he said it's the biggest ripoff in the home industry. So I went and looked at the "In Stock" carpet at Lowes and Home Despot...they range from around half a buck to about a buck a square foot. A quick look at the math and I need about 600 square feet of carpet. As my best friend Renee said, "I'm sure there will be a learning curve." Which means the first room I do will take me probably 3 times as long as the last room. With that said I still think it will only take me 3 days to do it all working by myself. Well...except for the day I go buy the carpet and carry it up to the third floor...I think that day I'll be needing some help. Same with carrying out the old stove and carrying the new one up there. That's the worst part about this all happening on a third floor...it's a bazillion trips up and down to get all the trash and extra supplies and tools I'm finished with out of the apartment and (except for the trash) down into the basement where it belongs. 3 or 4 trips and I'm wiped out and need to sit down for a little while and take a break.
Today I'm going to try to empty out a room or two so I can get going on tearing out and cutting up the old carpet. I may just pile some of the stuff out of the way for now so I can get going on the carpets and hopefully have some help carrying things down some other day.

21 December 2005

Getting Laid...or...How to Put in a Vinyl Tile Floor

The first step when laying a new floor is to measure the room from side to side and find the center point. From that point you start laying out the tiles towards the side of the room. By starting in the center of the room you will end up with the most even cuts at the edges of the floor and the straightest possible looking floor.
Once I laid the tiles out I decided to shift the patter two inches to the left so that there would be whole tiles along that wall and almost full half tiles on the other edge rather than having small cut pieces on both sides.


The next step is to re-measure everything and snap a chalk line across the room at the center point. My line is parallel to the exterior wall which tents to be the straightest wall in a house.
With the chalk line down the first tile is laid at the center point that we already measured and marked.


Part of the beauty of painting the floor with primer before I started (besides the fact that it's what the directions say to do for the best possible adhesion) was that it made it simple to ensure the floor was clean and smooth before I laid the tile in place because any imperfections in the sub-floor (especially bumps) will telegraph through...they will show on the surface of the new floor. So before I put each tile down I went over that spot with a spackle knife scraping off any specks of dirt that got stuck in the paint and then swept all the debris away. Besides sweeping I was constantly going around the room with my shopvac. "Sweep sweep. A thousand times sweep" Is what Dan (the guy that made me a carpenter) always used to say.

The tiles are laid one quadrant at a time working in a stair step pattern so that everything stays straight and even and there are no gaps between any of the tiles. All that means is you lay 1/4 of the room at a time working out from the center tile.
The tiles at the top of the photo are still there from my test layout and are not glued down. I did it again after I snapped the chalk line just to make sure I had it right and that my two inch move wasn't going to cause any problems elsewhere in the room (which it didn't).


As you can see I left myself with relatively few tiles to cut and for the most part they are half a tile or bigger (I think smaller pieces are more likely to come un-glued down the road).


The quadrant system is repeated until all 4 sections of the room have been completed.
Once it's all down the floor is supposed to be rolled with a floor roller. I don't have one. I could probably rent one. The other option they give you is to use a rolling pin. I tried, it was a pain in the ass and nearly impossible. I do have a "J-Roller" which is a small rubber roller mainly used for linoleum countertops and backsplashes but it worked pretty well for me, especially on the smaller tiles around the edges. I'm still thinking about getting a floor roller and cranking the heat up for a while and then giving the whole floor a good roll. It's not like I won't get more use out of the darn thing...I have 2 houses that I'm supposed to be doing paid work on just sitting out there waiting for me to finish this apartment and I now know more than ever that I need to re-do the kitchen and bathroom in the downstairs part of my house (Where I live) before I can move and either rent or sell this place.


Once the floor was done I put back the heater covers and 1/4 round trim and that's pretty much the end of the deal.
I bought some oak colored trim today to cut and put in around the cabinets but when I put it down to check it out I wasn't 100% sold on how it looked so I think I'll get a second opinion before I start cutting and nailing it. At this point I also have 2 4x8 sheets of luann plywood down on the floor to protect it while I move the appliances in and finish up the rest of the kitchen (yes Dan, I know...the floor should have been last 'In a perfect world').

20 December 2005

Prepping the Floor

Although I chose 'The Easiest" floor to install (vinyl self-stick tile) the prep work was pretty substantial.
The first step was to remove the heater covers and 1/4 round trim around the edges of the old floor. Next I shop-vaced the floor and then mop it with a really strong ammonia solution 4 times to get the 35 years of grease and crud off. I had to wear my gas mask the entire time and I had the windows open even though it was in the single digits outside that day.


Once I had the floor scrubbed down as clean as it was going to get my next step was to lay down an, "Embossing Leveler" over the entire floor. This is done so that the texture in the old floor doesn't "Telegraph" or show through the new floor as it gets walked on. The same product is also used around the edges where there were gaps around the edges of the old floor or where I cut away pieces of the old floor that were curling up and to fill any other holes such as gouges or cigarette burns in the old floor making a totally smooth surface for the new floor to stick to.
The darker section is the last one I applied and it hadn't dried yet when I took this picture.


After allowing the floor leveler to dry overnight the next step Armstrong recommends when prepping for a self-stick floor is to paint the entire floor with a good quality latex primer. I use Sherwin Williams paints because they tend to be a high quality product and the store is only a block from my house.
As with any other paint job I cut in the edges and then rolled the main field making extra sure the paint was smooth and even because any drips or imperfections would show through the same way the embossing would have had I not used the leveler.


I let the paint dry for about 4 hours (I asked the guy at the paint store and he said two but I like to stay on the safe side) before I started laying the new floor which I'll go over next time.

19 December 2005

Power!

One of the many mistakes I had to correct in the kitchen was the electric line for the stove. The last guy used a nice beefy wire but for some reason had it come in through the floor and it was then screwed directly to the back of the stove. The funny thing there is that the beefy wire is aluminum and it said in big print all over the back of the stove not to use aluminum wire, that a copper connection had to be made and the wires spliced.

Simple enough solution, the back wall had cracked and crumbled (I didn't make that hole) so all I had to do was make a small hole in the baseplate of the wall (the 2x4 that goes along the floor that the vertical wall joists are nailed to) to fit the wire in and cover it with a protective metal plate (so that you can't nail or screw into the wire). The second plate is just there to hold the broken pieces of lath together for the new plaster.


Here you can see the fresh plaster I applied. I used the mesh tape along the cracks that covered the entire length of the wall and put some down inside the hole as well. Then I mixed up a batch of 90 minute joint compound and filled the hole and covered the tape (and thus the cracks).


Once the plaster dried I sanded it smooth with the old wall, primed and painted. I would have done a second layer of spackle to really smooth out the area where the hole was (I was a little short with my first batch) but this will be behind the new stove so I went for the speedier solution. It looks fine...100% better than it did with the cracked crumbling wall that had probably been that way for 35 years since the kitchen was first put in.


Next...we get rid of this hideous floor!

16 December 2005

Installing the Drawers

Today's post will be short and to the point as I am 3/4 of the way through putting in the new kitchen floor and I'd like to get it done today.

So with the boxes all made (the ends were sanded smooth after the glue dried and I knocked down all the edges (which just means I went around all of the corners and sharp edges with a piece of sandpaper and rounded them over...you can actually cut yourself on a really clean wood edge, and I think they are less likely to splinter if you smooth them off a bit.)) it's time to put in the new drawers.

The new 'European style' drawer glides are pretty simple to install. There are 2 pieces on each side, one gets screwed to the bottom of the drawer and one gets mounted to the cabinet. One screw on the front is all you need to attach the glide


The back of the glide is easily attached to the cabinet using a 'Shoe' (not included but only a buck extra). You simply put the back end of the glide into the plastic shoe and then making sure the glide is straight and level you put a couple of screws in the back of the cabinet to hold the shoe in place. There are slotted holes on it so that you can make some adjustments once you get the screws in and then I put a few in the round holes to lock it in place.


As far as mounting the drawer, that's it...you're done. The glides should fit nicely together and the drawers should move in and out without catching (like they can on the little screws that hold the glides to the bottom of the drawer if they aren't in tight).


The final step is to mount the drawer fronts on the new boxes.
I hold the drawer front in place and poke through the holes using an awl (a screw or a nail will work) marking where I need to drill into the new box. A couple of small holes are drilled in the drawer and the screws hold the handle on and the drawer face in place.


Done.

(and you can clearly see why I'm replacing the kitchen floor)

13 December 2005

Dovetails

Today's entry will be the dovetailing process I went through building the new kitchen drawers.

What we're looking at here are the front and side of one of the drawers set up in my dovetail jig. I got the jig 6 months ago knowing this job was coming. It's another tool from Harbor Freight http://www.harborfreight.com/cpi/ctaf/Displayitem.taf?itemnumber=34102 I got it on sale for $29...never buy anything from them that isn't on sale...because it will be soon and it's often half price or less.
Sitting next to the jig is my router with a 14 degree dovetail bit set at the proper depth for the wood thickness. It took several practice pieces (they are on the workbench in the picture too) to tweak the depth of the bit so that the cut pieces fit together perfectly. Well worth the time it takes to set up the jig (maybe half an hour and it was fresh out of the box) when doing 'production work' like I did...lots and lots of pieces that all need to be the same.

Here you can see that the back(or front) and side boards are set into the jig offset by the width of the board. The 'fingers' (the aluminum piece) in this case are the ones made for 1/2 inch thick wood. You can also see that it's the inside of the drawers facing out in the jig because the dado I cut (see yesterday's post) is visible.

With the pieces locked in place by the jig it's really simple to run the router along the 'fingers' of the jig. I had to buy a small collar for my router that is actually the part that makes contact with the jig.
The beauty of using the jig set up is that you get the exact same cut every time. Once you make the series of cuts you just un-clamp the pieces and put the next pair in the jig and cut them. I had 5 drawers to make so that's 20 pairs of dovetails I needed to cut. I wasn't keeping track but it probably took me about an hour, maybe two to get all of the dovetails routed out.

basically there are two parts to a dovetail joint, the "Pins" and the "Tails" When they are cut properly they will slip together creating a tight bond and a great deal of glue surface. When making a drawer logic dictates that the pins (the part that looks like a bunch of keystones sticking out on the end of the board) are on the sides and the tails are on the back and front of the drawer that way all of the stress from the drawers being opened and closed will pull against the pins and dovetail joints can't come apart that way.

In this picture the side piece is the vertical one and the back (or front) of the drawer is the horizontal piece. They are not fully assembled for demonstration purposes.

Here we are looking at the final step in the drawer building process, the "Glue Up."

After test fitting all of the pieces and making sure the 1/4 inch plywood drawer bottoms fit in the drawers are dis-assembled and the joints are glued, re-assembled and clamped. The extra pieces of wood under the clamps are called "Glue Blocks" and they are simply scrap pieces used so that the clamps don't dent the actual drawers when full clamping pressure is applied. They also help to spread the clamping pressure over a wider area.

For this project I used Gorilla Glue. It's a semi-new product that I really like. If you're using regular wood glue you coat both pieces with glue before clamping them together and then you wait until the glue dries. With Gorilla Glue you apply the glue to one of the pieces you are connecting (I glued the tails (the cut-in parts)) and simply wet the other piece before connecting and clamping. The Gorilla Glue chemically reacts with the water and expands (like spray foam) as it dries filling any gaps in the joint. Once it dries it is completely waterproof, unlike regular wood glue.

The last thing I'll mention here is that the drawer bottom is not glued in at all, it should 'float' in the dado allowing for seasonal expansion and contraction of the wood.


And that's it. Let the glue dry in the clamps for 3 or 4 hours and the drawers are finished and ready to be put in.

Yup...you guessed it...next post = how to put in new kitchen drawers.

12 December 2005

Drawers


Today's project begins in my workshop with a pile of wood and a couple of power tools.
One of the problems in this house is the poor quality of the kitchen drawers. While the cabinets are solid Oak and pretty well made...the 35 year old plastic drawers were just complete shit. I had the same crap in my kitchen and built new drawers several years ago while I was still a home-repair trainee. Basically all I'm building are a series of shallow boxes that will become the new kitchen drawers.

The first step (after buying all the materials) was to run all of the boards on my table saw a couple of times creating the dado that the drawer bottoms will sit in. This can be done with a straight bit and a router or a dado blade in the table saw...but either one of those options would have meant a lot of time setting up the tool and I don't even own a dado blade for my saw. So with the blade set at about 3/8 of an inch I set my rip fence at about half an inch from the blade and ran the boards across it length-wise. This left a cut in the wood about 1/8 inch wide and half way through the width of the board. I then moved the rip fence out 1/8 of an inch and made another pass along the boards. With another fence move and cut I had finished my dado. There is now a slot along the length of all of the drawer sides that the 1/4 inch plywood bottom will slip right into.

Once all of the boards had the slot for the bottom of the drawer it was time to switch to the other saw in this shot and begin cutting the boards to length.
Measure Twice Cut Once.
Words to live by.
I tend to measure 6 times and cut 3 or 4...but someday I hope to measure twice and cut once.

First hint...don't go by the old drawers.
Measure the opening in the cabinet for each drawer and then measure the depth of the cabinet. Take an inch off of each of your measurements and you have the lengths you need to cut for your drawer pieces.
Measure Twice Cut Once.

Depending on how many pieces you are making you can either measure each on individually and cut it or if you are using a mitre saw you can lock it in place and put a 'stop block' next to it at the right measurement and then you just need to butt your board up against the stop and make your cut...that way all of your pieces will be exactly the same. I wasn't making enough pieces for that so I just measured them and cut them individually.

When I built my first set of drawers a few years ago for my kitchen, I used 'box joints' and nails to put them together. A crappy connection that is essentially fit tab a into slot b, glue and nail it together. They are functional but ugly with minimal glue surface (most of the time it's the glue and not the nails that hold furniture together...generally the nails are there to 'clamp' the piece until the glue dries)
For this set I decided to go a little more traditional for the joinery so we are going to explore the "half-blind dovetail" in my next post.

05 December 2005

Everything...Even the Kitchen Sink

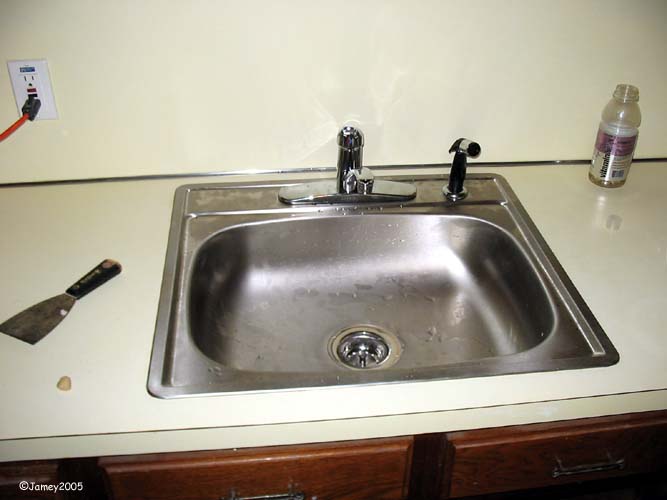
I didn't take any process pictures, I was too busy running around trying to get everything I needed for this job and get it all in and done. But I got it done and here's the new kitchen sink.

Here's what the new works underneath look like:


And Here's the finished product up top:


The process began on Saturday when I shut the water in the house and went up to the third floor to start removing the old sink. Because of how the last guy soldered everything in...My only choice really was to cut the whole mess out and start over.
The removal of the old didn't take me very long...Cut the supply lines where they came out of the wall...Disconnect the crumbling drain lines and pry the old sink out of the hole (note to self...Don't hit the sink with a hammer and chip the enamel because you'll find out as soon as you do that the 70's avocado has become strangely retro-popular and you probably could got a fortune if you sold the sink to another restorer.

So once the old sink was out it was time to make new connection pieces and put them together with nice new shutoff valves (the 33 year old shutoff valves under the sink were completely frozen in place. More often than not when you turn an old valve it's going to develop an instant leak, so as in this case, it's best to just replace everything and begin anew.

The 2 most important parts of soldering copper (or brass) pipe together are making sure the parts are totally clean and that they have been covered with flux where the solder needs to go.
There are many tools on the market for cleaning the parts, brushes, mesh, sandpaper are just a few. It's as easy as rubbing the end of a piece of copper pipe with sandpaper but if you don't do it your solder will be less likely to hold and you'll end up with leaks in your plumbing.
The Flux is applied to both parts before fitting them together to be soldered. The simple answer is that the flux makes the solder flow into the joint. Try heating up some pipe without fluxing it and tell me if the solder sits on top or sucks into the joint like it's supposed to.

Along with the solder connections there are no less than 8 screw-tight connections that needed to be made under the sink. To ensure those don't leak there are 2 choices out there, one is Teflon Pipe Thread Tape and the other is called Pipe Dope. Although I've used it before, Dan's training was to throw away the Teflon Tape that comes with a lot of plumbing stuff and to use Pipe Dope on all of the screw in connections. You can see the pipe dope in the pictures, it's the blue stuff on the threads. You coat the male threads with it and then make the screw connection. It's just another layer of protection against leaks.

Make all of the connections on the sink before putting it in place. Including putting in the strainer basket. For that one, put a bead of Plumbers Putty around the underside of the strainer where it meets the sink on the inside and then use the rubber gasket that it comes with on the underside of the sink where the cup and the nut attach. Tighten the nut down until the Plumbers Putty squeezes out around the edge of the strainer until the strainer is tight against the bottom of the sink.

Next, put a bead of plumbers putty around the lip of the sink where it sits on the countertop and set the sink in place. Using the clips that came with the sink, tighten the sink down to the countertop from below. As you tighten the screws on the clips the Plumbers Putty should squeeze out along the edge of the sink where it meets the countertop. When it's totally tightened down you can use a scraper to go along the edge of the sink and remove the excess Putty. You can also remove the squeeze-out from underneath the sink if you so desire. I did because it was almost a full can of Plumbers Putty that I recovered to use again on the next project.

After the sink is set in place you can make all of the screw in connections for the supply and drain lines and you're ready to test it out.
When you first turn the water back on after shutting it and draining the system, remove the aerator part of the faucet (the tip with the screen) before you turn the water back on for the first time. I have a whole house water filter on my water main...But I still remove the end of the faucet because when you first turn the water back on after draining the system there tends to be all manner of rust and dirt that come rushing out as the system re-fills with water. You remove the end of the faucet so all that junk just goes down the drain and doesn't plug up those little holes and screen in the end of the faucet assembly. Once the water runs clear you can shut the faucet and re-attach the aerator.

The final step is to fill the sink with water and let it sit there for a while. After about an hour you should be able to check underneath and make sure there are no leaks.
Then you remove the strainer basket and let the water drain out making sure your drain lines don't leak.

And that's it...You have a new sink.
(well...I do :) )

04 December 2005

Procrastination.

One of the things I’ve been dealing a lot with as I go through this project is a certain degree of self doubt. It makes me constantly have to struggle to make myself begin each project. I debate whether or not I can do it...if I need to do it...how much am I willing to do...can I afford this...

Yesterday is a perfect example of what I’m talking about.

I’ve known since this whole project began that the kitchen sink was going to have to be replaced, it’s that 70’s green (with matching stove, vent hood, and floor) but the water here is terrible for all sorts of minerals that stain and leave huge deposits on things (you should see some of the Stalactites hanging from the shutoff valves in my basement) and the old faucet was a leaker so the sink was beyond cleaning and salvaging. For 6 months I’ve known it was coming and with the bathroom pretty much done I’ve started working on the kitchen. There were a few days this week I could have taken the sink out but didn’t. Yesterday after 3:00 when the house was empty and I could shut the water off was supposed to be my window of opportunity. But I sat around and procrastinated until almost 8:00 before finally getting up the gumption to just go shut the water and do it. It’s almost like I put my brain on auto-pilot once I make the decision and stand up to get started, that way I guess I shut off the Doubting Thomas voice (along with the rest) and just get rolling. Especially on a project like this because once you get started you really can’t stop until it’s done (gotta finish the plumbing before the water can be turned back on).
So with my brain shut off I went to the basement and turned off the water and headed upstairs. It took me until about 12:30 last night to get everything soldered together and pressure tested (turn the water back on and check for leaks) I actually did a little extra and made the small pieces to connect all the fittings I need together and soldered everything in place. The only solder connection left is the trap adapter I’m going to put on the drain line so that the next guy will have an easier time replacing things down the road. The chrome P-Trap that was in there was so brittle I could barely get a grip on it to pull it out (when I heated the solder holding it into the wall pipe) because it kept crumbling in my hand. With a trap adapter on the end of the pipe coming out of the wall you just have to un-screw the nut and you can remove the trap and replace it without ever having to light a torch.

Next thing I’ve been trying to find a way to not have to do is replace the countertop and backsplash. I’ll probably go up today and remove the countertop. It’s sooooo faded and there’s a piece broken off one of the corners...I could glue it back and you’d barely notice...but that’s one of those things where Dan is right...All New. With the amount of time I’ll be putting in here when all is said and done...why leave an ugly 30 year old counter top when I’m doing a new sink, new appliances and a new floor?
I went to the store yesterday morning to buy all the supplies I need to make a new countertop and do the backsplash...but I couldn’t bring myself to make the final decision to go for it so I left with nothing. I’m still debating even now...I just kinda had myself talked into leaving the countertops again. Ugh.

02 December 2005

One of My FAVORITE Toys! :o)

As seen in something like 165 episodes of the New Yankee Workshop...

Yup...me and Norm Abram have the same mitre saw!!

I found that out a couple of years ago after I bought it at Zern's (a semi-local flea-market I LOVE going to) for sixty bucks.

I looked it up online when I got home (googled the model #) and the first listing that came up was some crazy fan site where they have a count of how many times Norm uses what tool on the show.


Apparently this was the first mitre saw with a laser guide, it sold for around $600 and had a ten year production run because it was so popular (I think it was the only laser saw on the market for the first six or seven years they made them)


Besides all that...I also ended up on the Porter Cable website and I just can't say enough good stuff about them. I couldn't find the product manual on their site so I sent them an email and told them I just picked up the saw at a flea market and asked about the manual because the laser guide was a little out of alignment. I don't remember if I got an email response...but about a week later I got a package in the mail from them with copies of all of the original paperwork on the saw and a nice letter from them. Pretty cool considering they knew up front that they didn't make any money off my purchase of their tool.

And no...I still haven't fixed the laser...I've just gotten used to where it's off :o

01 December 2005

Toys

Toys!
Toys!One of the new toys ...uh... I mean ... um.... tools that made the painting of the apartment a fun task.

The Wagner Power Roller.

Turns out it’s REALLY cool!

I read a ton of reviews before I bought one and came to a simple conclusion. The people who didn’t like it seemed to expect this thing to turn them from total bozos into professional house painters with the flick of a switch.

That it will not do.

What it will do is make it so you never have to stop and go back to your roller pan to put paint on the roller. In fact, you don’t have to stop at all. What I found is that if you know the difference between, "Rolling On" and, "Rolling Out" painting with this thing will be an absolute DREAM!

It’s pretty simple, you push the button to start the pump and roll on your typical 3 or 4 foot section of wall then push the button again to stop the pump and go back over the same area to roll out the paint you just applied. What I found works best is to turn the pump back on again about a foot and a half before you get back to where you want to roll more paint on the wall.
That’s the way I figured out that seemed to go the fastest for me. And man lemmie tell ya, did it go FAST! I rolled the paint on the entire apartment...

That’s; Living room, 2 bedrooms, kitchen, upstairs hallway, 2 flights of stairs and the landing in-between ...in 2 days! 1 day for all the ceilings and cutting in and spot priming...probably not even a whole day, more like an afternoon since I did it the day I bought the thing and I know I didn’t get home from the store until noon. And 1 day to paint all of the walls including all the cutting in and last minute fixing and spot priming and such.

Some of the reviews I read complained about it being too much of a pain to clean out. Personally, I don’t throw away things like roller covers or pan liners after every time I use them so I spend some time cleaning up my tools anyway. And the actual machine cleans it’s self while you rinse off the other parts so I don’t see what the big deal is. Plus they have this little gizmo for a few bucks that hooks onto your faucet (or hose) and washes the roller pad out better and faster than anything I have ever used to clean a pad. And if you still insist on throwing them out after one use in stead of cleaning them...go ahead, they are only like two dollars more than the same quality of a regular roller pad and you can still go watch tv for 5 minutes while the machine pumps a bucket of water into the sink which is all it takes to clean it.

So would I pull it out for a small job...probably not. For a whole room...probably. For anything more than that...you betchya!!! It easily saved me at least two days of painting on that place.

So I may have a weakness for tools...but jebus do they make some coolass tools that just save oodles of time on a job as well as making it easier and more fun. Not to mention way less of a pain in the back!