
Window to Wall 7
Woo Hoo Spackle!
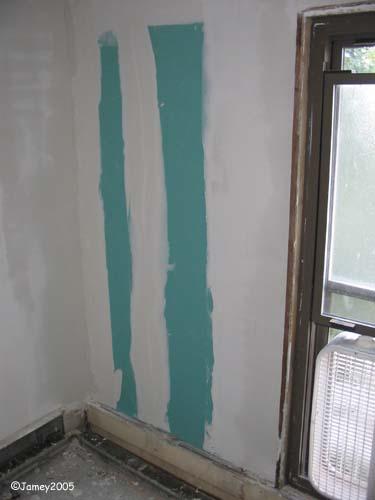
Ok...so here’s pretty much where we’re at now. With the greenboard up I went ahead and started putting on the layers of spackle pretty much following the Dan method which works quite well if you go through all the steps several of which are visible here.
Essentially the process consists of applying 3 layers of spackle and then sanding it smooth.
First...I can not say enough about using a joint compound (spackle) that you have to mix from a powder rather than using what comes in the pails. If you know the difference between drying and curing you know pretty much all you need to know. Let me just say this for a bathroom application like I am doing here...The plaster (joint compound, spackle) that comes in a powder that you mix with water undergoes a chemical reaction wherein the plaster hardens (cures). The joint compound that comes pre-mixed in pails it gets hard as the water evaporates out of it (dries). The difference is this...if you take a blob of each type (mix vs. pre-mixed) and let them harden and then toss the hard chunks into a pail of water... the powdered mix type plaster chunk will sink to the bottom like a rock and sit there until you take it out of the pail (note...this is why you never wash anything with plaster on it in a sink or anywhere that the plaster will get into the plumbing because it will settle and harden in the pipe and be there permanently eventually filling the pipe). The hardened chunk from the pre-mixed type of joint compound, on the other hand, will soak up the water turning back into a workable mix or just disintegrating in the pail if you leave it there a while. This is why you can ‘sand’ the pre-mix stuff with a wet sponge the next day after it has dried. Ok...so lets get back to the bathroom, do you see why the pre-mix stuff would be a bad choice? Right...because when the bathroom gets all hot and steamy and the walls start to sweat, like bathroom walls do, what’s going to be happening in the spackle? It’s going to be soaking up that water and becoming pliable again. Over time it will sag and crack and just turn into a mess. The mix type plaster? Well...you can go back and look at that chunk of it still sitting in the bucket of water that now has a thin layer across the bottom where the pre-mix chunk completely disintegrated. What I’m saying is, the water will have no affect on the cured plaster (spackle) which is why I think it’s the way to go anywhere, but especially in a bathroom where water is an issue.
Ok...so back to the 3 coat process. To begin with I like to use SheetRock brand joint compound and it comes in 2 types, a regular and a lightweight version. The regular one resists cracking and is made for filling bigger holes and gaps whereas the lightweight one is meant more for the outer layers and filling smaller gaps because it is sandable. So the first batch I mix up is the heavier type of joint compound that I will go ahead and fill all of the gaps and holes between pieces of drywall as well as laying in a good amount along the joint between sheets. This first layer is done with a 6 inch “tapers knife” which you also use to press the joint tape into the first layer of spackle you just applied as you smooth out that first layer. I was taught to put the next layer on right over the tape at this point to expedite the whole process. I don’t like to do it that way, I prefer the slower but more reliable method of letting the tape layer set and then going back with the 6” knife and another batch of heavy joint compound and applying the first layer over the tape.
The key to all of this is “feathering the edge” which just means going back along the edges of the wet plaster with the knife pressed down on the outside corner so that the blade flexes towards the inside corner that is raised off the wall thus smoothing the outlying edge of the plaster down to the wallboard.
The other thing I should mention about the mix-type plasters is that they are made to cure within a specific time frame and are sold generally with the number of minutes that takes on the label. For example, I like the 90 minute joint compound (both light and heavyweight) that is made to cure in 90 minutes. The key is to look at the chart on the back of the bag though and see what the ‘working time’ is for whatever type you are using. That’s a good guide for how long it will take before the chemical reaction that hardens the plaster begins and it becomes un-workable. I think I have pretty close to an hour to work with the 90 minute ones, whereas they make a 20 minute variety (that Dan the Marine that trained me likes) that you only have 8 minutes to slap up on the wall before it gets too hard to use. He likes that one because by the time you clean the pail and your tools and mix up another batch the last layer is ready to be covered up. I can’t work that fast so I go for the longer timespan ones. I don’t mind having to go get a snack and being able to catch my breath in-between layers...so it takes a little longer, oh well.
At this point you don’t want to waste your time sanding, you can just take your 6” knife and knock down any high spots, lumps or ridges in the first layer.
For the second layer I switch to the lightweight joint compound and a 10 inch spackle knife. Working out from every corner, across every row of screws and along the joints between sheets of drywall I just lay on a generous amount of joint compound, clean the knife and then go back over the thick layer thinning and smoothing it in one fell swoop. If need be, go back and feather the edges again the same way as before, it actually becomes easier as the knives get larger. When this layer is ready you can go back and knock down any high spots again with a knife.
I like to use at 12 inch knife for my final layer which is still the lightweight setting-type joint compound. After this layer sets up is when you want to go back with a drywall sander and smooth everything out. And here is where one of the most important Dan lessons comes into play, “The illusion of smooth is more important than smooth.” Don’t worry about trying to get the entire wall perfectly smooth...just try to get rid of all the bumps, holes and ridges and you’ll be amazed at how smooth it looks.
Ok...so the picture. You can see a few of the steps going on here. In the corner and the first row (of screws) to the right of that you can see the spackle is a bit darker, this is the heavier joint compound that was applied with a 6” knife. Right next to the window the spackle is a bit lighter indicating the light weight mix and it’s also a bit wider, I probably did the 10” knife layer over there.
posted by Jamey @ 11:15 AM
![]()
0 Comments:
Post a Comment
<< Home