31 October 2005

Time For Tile


Once I got the tub in, it was time to start tiling the floor.
I first bought a $20 (on sale at Harbor Freight Tools www.harborfreight.com) tile cutter...The kind that scores and then cracks the tile. If you look in the middle of the tile pile you'll see some rather odd shapes cut out of the small tile I ended up choosing for the floor. Even though the tile cutter has a circle cutting attachment I still ended up going to Lowes and buying a Wet Saw. Good thing I did! The cheap tile cutter was totally lame. I couldn't get it to cut a straight line on these small tiles or even on the bigger ones for the tub and not only wasn't the line straight it wasn't clean, it left a much more jagged edge than the Wet Saw. So, once again...The lesson I guess I'm still working on learning is don't buy the el-cheapo tools when it's something you need to have do a quality job.
The only thing that sucked about the wet saw is that it was down (and then back up) the 2 flights of stairs to the third floor because you can't use a wet-saw indoors because of the spray so I had it set-up out back.
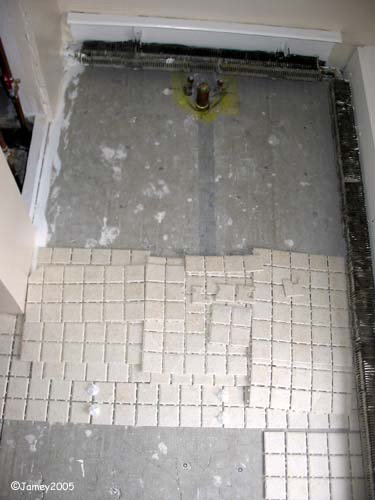
But when you're doing tile there is nothing like a Wet Saw and a good blade to cut out the myriad of shapes you need to do a typical tile job. In this case I had to go around the sink pipes and the 'Closet Flange' which is where the toilet attaches to the floor as well as various corner cut-outs.

One thing I want to mention here is the vertical blueish stripe on the cement board starting at the drain pipe. It's the remnants of a piece of painters tape I put down when I first laid the cement board over the sub-floor to mark where the drain pipe was because of how close to the surface it is. That way when I was screwing and nailing the cement board down I would know to not put any screws or nails in where they might puncture the plumbing lines.

27 October 2005

Tub's In


I know I'm starting WAY into the process here but I'm already past this and trying to catch up.

So here I have the bathtub in and hooked up finally.

I'm not sure if I ever gave the full description of what's going on with this current project...

The gist of it is that I am re-habing a small apartment.
The big old house was built about 100 years ago and the third floor of the place was turned into a rental apartment in 1973. There was a girl living up there for the past 5 years that moved out this summer and she not only left the place a mess...but she actually did some serious damage on her way out (rolled a dresser down the 2 flights of stairs leaving HUGE holes in the walls).
I started by painting the entire place, figured I'd do that and then carpets and be ready to rent it again. Well...as things so often go....everything I touched became a can of worms and I ended up having to do some major repairs.
The bathroom had to be torn out down to the stud-walls and sub-floor with all of the plumbing and electrical and everything replaced. The extra bonus was the window to wall project that began my posting on this blog, that too is part of the bathroom.
Anyway...after months of work putting up new walls and a new ceiling and new cement board for the floor and running new wiring and painting the room 4 times (2 primer and 2 top-coat) I finally got the bathtub put in. It was fairly simple. I ran a stringer along the wall...which just means I screwed a 2x4 to the wall that the side of the tub sits on. I put in a enameled steel tub. I don't like the idea of plastic or fiberglass for a tub. I really would have liked to have left the cast iron tub that was there, it surely would have out-lasted the new steel one...but it was an ugly yellow so I decided it had to go. Besides, I had to put in new walls around it and a new floor under it because the old tub walls had leaked and let everything get moldy and rotten.
The plumbing fixtures were already hooked up...I like to do all the torch work when the walls are totally gone so I have as much room as possible. The measurements are pretty simple...I like to leave at least 1 full tile above the tub before you get to the tub spout and then the faucet installation directions will tell you how much above the spout it needs to be (9" in this case).
The drain lines had to be replaced because the new floor and wall moved everything just enough that the really nice old brass stuff wouldn't fit anymore. I ended up using PVC. One tip from the pro...throw away the teflon tape they give you. If the PVC leaks when you put it together you can use some Pipe Dope on the threads where it leaked and try it again. I had to use some on this project. It's just a good safety barrier to leaky pipes. But the teflon tape is apparently crappola.
One of the most important steps is to test your work. Fill the tub with water and let it sit there for at least a few hours, over-fill it at first to make sure the overflow works. Check everything for leaks and also make sure the 'stop' is set right so that it will hold the water in the tub for a bath. Check for leaks again as you let the full tub of water out down the drain. Adjusting the stop right so it will hold the water right for a bath but still let it drain out fast is a pain in the butt and is quite time consuming to get it just right.

26 October 2005

Always Take Time For Safety


Todays lesson will be short and sweet.
Always wear Safety Glasses.
ALWAYS!