

Getting Laid...or...How to Put in a Vinyl Tile Floor
The first step when laying a new floor is to measure the room from side to side and find the center point. From that point you start laying out the tiles towards the side of the room. By starting in the center of the room you will end up with the most even cuts at the edges of the floor and the straightest possible looking floor.
Once I laid the tiles out I decided to shift the patter two inches to the left so that there would be whole tiles along that wall and almost full half tiles on the other edge rather than having small cut pieces on both sides.

The next step is to re-measure everything and snap a chalk line across the room at the center point. My line is parallel to the exterior wall which tents to be the straightest wall in a house.
With the chalk line down the first tile is laid at the center point that we already measured and marked.

Part of the beauty of painting the floor with primer before I started (besides the fact that it's what the directions say to do for the best possible adhesion) was that it made it simple to ensure the floor was clean and smooth before I laid the tile in place because any imperfections in the sub-floor (especially bumps) will telegraph through...they will show on the surface of the new floor. So before I put each tile down I went over that spot with a spackle knife scraping off any specks of dirt that got stuck in the paint and then swept all the debris away. Besides sweeping I was constantly going around the room with my shopvac. "Sweep sweep. A thousand times sweep" Is what Dan (the guy that made me a carpenter) always used to say.
The tiles are laid one quadrant at a time working in a stair step pattern so that everything stays straight and even and there are no gaps between any of the tiles. All that means is you lay 1/4 of the room at a time working out from the center tile.
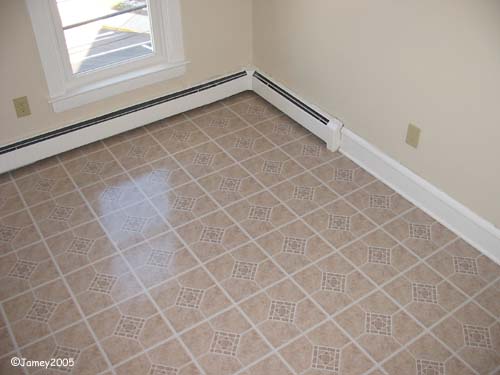
The tiles at the top of the photo are still there from my test layout and are not glued down. I did it again after I snapped the chalk line just to make sure I had it right and that my two inch move wasn't going to cause any problems elsewhere in the room (which it didn't).

As you can see I left myself with relatively few tiles to cut and for the most part they are half a tile or bigger (I think smaller pieces are more likely to come un-glued down the road).

The quadrant system is repeated until all 4 sections of the room have been completed.
Once it's all down the floor is supposed to be rolled with a floor roller. I don't have one. I could probably rent one. The other option they give you is to use a rolling pin. I tried, it was a pain in the ass and nearly impossible. I do have a "J-Roller" which is a small rubber roller mainly used for linoleum countertops and backsplashes but it worked pretty well for me, especially on the smaller tiles around the edges. I'm still thinking about getting a floor roller and cranking the heat up for a while and then giving the whole floor a good roll. It's not like I won't get more use out of the darn thing...I have 2 houses that I'm supposed to be doing paid work on just sitting out there waiting for me to finish this apartment and I now know more than ever that I need to re-do the kitchen and bathroom in the downstairs part of my house (Where I live) before I can move and either rent or sell this place.
Once the floor was done I put back the heater covers and 1/4 round trim and that's pretty much the end of the deal.
I bought some oak colored trim today to cut and put in around the cabinets but when I put it down to check it out I wasn't 100% sold on how it looked so I think I'll get a second opinion before I start cutting and nailing it. At this point I also have 2 4x8 sheets of luann plywood down on the floor to protect it while I move the appliances in and finish up the rest of the kitchen (yes Dan, I know...the floor should have been last 'In a perfect world').
posted by Jamey @ 4:40 PM
![]()
0 Comments:
Post a Comment
<< Home