

Dovetails
 Today's entry will be the dovetailing process I went through building the new kitchen drawers.
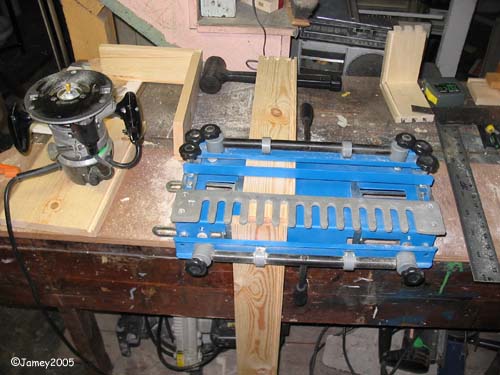
What we're looking at here are the front and side of one of the drawers set up in my dovetail jig. I got the jig 6 months ago knowing this job was coming. It's another tool from Harbor Freight http://www.harborfreight.com/cpi/ctaf/Displayitem.taf?itemnumber=34102 I got it on sale for $29...never buy anything from them that isn't on sale...because it will be soon and it's often half price or less.
Sitting next to the jig is my router with a 14 degree dovetail bit set at the proper depth for the wood thickness. It took several practice pieces (they are on the workbench in the picture too) to tweak the depth of the bit so that the cut pieces fit together perfectly. Well worth the time it takes to set up the jig (maybe half an hour and it was fresh out of the box) when doing 'production work' like I did...lots and lots of pieces that all need to be the same.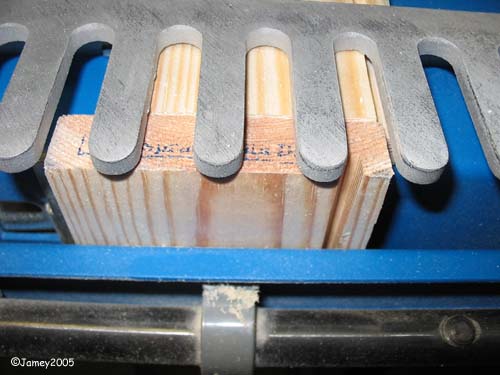
Here you can see that the back(or front) and side boards are set into the jig offset by the width of the board. The 'fingers' (the aluminum piece) in this case are the ones made for 1/2 inch thick wood. You can also see that it's the inside of the drawers facing out in the jig because the dado I cut (see yesterday's post) is visible.
With the pieces locked in place by the jig it's really simple to run the router along the 'fingers' of the jig. I had to buy a small collar for my router that is actually the part that makes contact with the jig.
The beauty of using the jig set up is that you get the exact same cut every time. Once you make the series of cuts you just un-clamp the pieces and put the next pair in the jig and cut them. I had 5 drawers to make so that's 20 pairs of dovetails I needed to cut. I wasn't keeping track but it probably took me about an hour, maybe two to get all of the dovetails routed out.
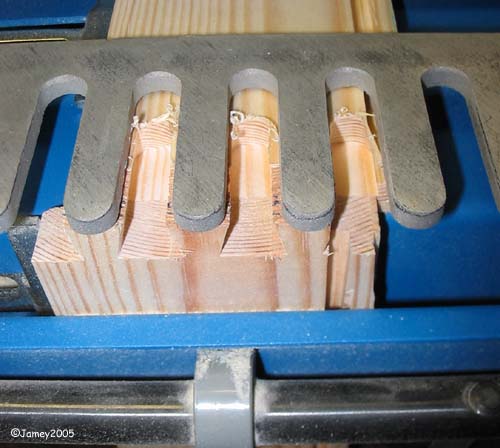
basically there are two parts to a dovetail joint, the "Pins" and the "Tails" When they are cut properly they will slip together creating a tight bond and a great deal of glue surface. When making a drawer logic dictates that the pins (the part that looks like a bunch of keystones sticking out on the end of the board) are on the sides and the tails are on the back and front of the drawer that way all of the stress from the drawers being opened and closed will pull against the pins and dovetail joints can't come apart that way.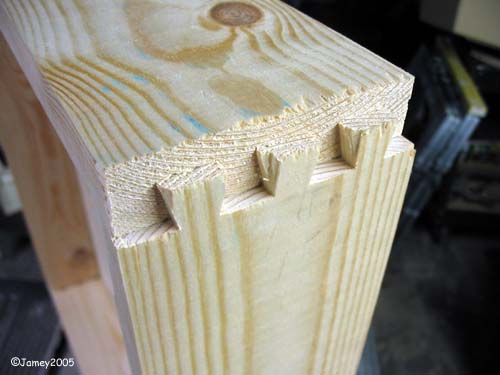
In this picture the side piece is the vertical one and the back (or front) of the drawer is the horizontal piece. They are not fully assembled for demonstration purposes.

Here we are looking at the final step in the drawer building process, the "Glue Up."
After test fitting all of the pieces and making sure the 1/4 inch plywood drawer bottoms fit in the drawers are dis-assembled and the joints are glued, re-assembled and clamped. The extra pieces of wood under the clamps are called "Glue Blocks" and they are simply scrap pieces used so that the clamps don't dent the actual drawers when full clamping pressure is applied. They also help to spread the clamping pressure over a wider area.
For this project I used Gorilla Glue. It's a semi-new product that I really like. If you're using regular wood glue you coat both pieces with glue before clamping them together and then you wait until the glue dries. With Gorilla Glue you apply the glue to one of the pieces you are connecting (I glued the tails (the cut-in parts)) and simply wet the other piece before connecting and clamping. The Gorilla Glue chemically reacts with the water and expands (like spray foam) as it dries filling any gaps in the joint. Once it dries it is completely waterproof, unlike regular wood glue.
The last thing I'll mention here is that the drawer bottom is not glued in at all, it should 'float' in the dado allowing for seasonal expansion and contraction of the wood.
And that's it. Let the glue dry in the clamps for 3 or 4 hours and the drawers are finished and ready to be put in.
Yup...you guessed it...next post = how to put in new kitchen drawers.
posted by Jamey @ 9:06 AM
![]()
0 Comments:
Post a Comment
<< Home