

Sinking (the) Dormer
I don't think I mentioned it before...but as this is a third floor apartment in a 100 year old house one of the little oddities is that the sink and toilet end of the bathroom are actually built into a dormer.
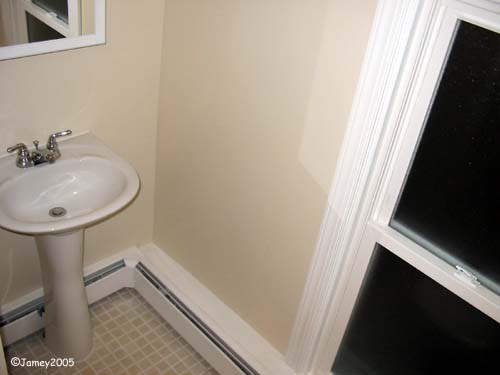
I guess the previous owners who are the ones that converted the third floor into an apartment thought two windows was a bit too much for such a small bathroom so they enclosed one (poorly) inside a wall and put in a vinyl replacement for the other in 1973. As you saw in yesterdays post it's a really stupid design because the toilet sits right in the window. What I would have liked to have done what with tearing it all out and re-building it (the Wall-to-Window posts from September) would have been to put in a half height but double-width window at the top of the wall...but unfortunately the outside of the house is stucco (probably also done in '73) and I wasn't going to start messing with breaking out and replacing the stucco 3 stories above the sidewalk. Not to mention trying to match colors with 30+ year old stucco which I did a LOUSY job of when I was patching down at ground level.
Anyway...Here's the pedestal sink and the heater is all put back together and attached to the new window sill and support structure I built. I used Cedar thinking it's in a bathroom and that's what the rest of the house is made of...went to a small lumber yard and got hosed, cost me $45 for 2 pieces of Cedar like 1"x6"6'
I don't like pedestal sinks anymore. Maybe I don't get the concept...maybe I need to put in a few more. But it seems to me like it is very hard to get everything lined up right so all the weight is where it should be. I still don't get what's really carrying the weight of the sink...or what will happen if it gets leaned on heavily. The clay seems thin where the 2 bolts and even the hanger plate attach the sink to the wall...and the base isn't a great support with the floor (the house) not being level but the sink is level on the wall. There is a heavy bead of caulk between the sink and the pedestal and another one between the pedestal and the floor. I figure my caulk is an adhesive so once it dries everything will be glued together nicely and it should hold up for a long time. What I'm saying also is that it took a lot more caulk than I think it should have. No matter how much I played with the alignment (a good hour or maybe even 2 before I attached everything) there was just no way to get it so that the back of the sink would be flat against the wall and the bottom would rest flat on the pedestal with the pedestal flat on the floor.
So...maybe it's just me...but I didn't like the whole concept of the pedestal sink and I don't think I will be putting one in again (unless I have to)
Today I went to 84 Lumber and got the wood to make new kitchen drawers. Forgot the plywood, picked that up at Home Despot...had to go there because the 84 didn't have the new drawer glides I'll need. But I'll tell that whole story when I start with those pix (when I start the project).
posted by Jamey @ 4:16 PM
![]()
1 Comments:
now, THAT's what I call a "BATHROOM"!!
Post a Comment
<< Home